Subscribe and save
Sign up for our newsletter and receive 5% off your first purchase and access to the latest news and exclusive discounts.
Support
Frequently asked questions
Installation
Maintenance video: In the maintenance video you will learn how to maintain your pedal and how to replace magnets.
SPORT2 | ENDURO2| ULTRA2 set up video Learn how to mount the cleats, install the pins and adjust the magnet height optimally.
GRAVEL set up video Learn how to mount the cleats, install the spacers and adjust the magnet height optimally.
ROAD2 set up video Learn how to mount the shoe plates, install the rotation screws and adjust the magnet height optimally.
1. Install your pins using the tool provided
2. Use both of the 2.5 mm Allen keys (one in the bolt to hold it, one in the top screw) to raise the magnet up
3. Use your shoe (with the shoe plate installed) to connect with the magnet. At this point, you will be able to rotate the shoe on the pedal easily.
4. Now, lower the magnet by adjusting the screws tighter (down) until the pins catch the shoe sole – ensure that the magnet fully connects with the shoe plate. You should hear a solid clicking noise.
5. When it is at the right height, the shoes should touch the pins and you should not be able to rotate the shoe easily.
Absolutely. Magped offers various magnetic strengths for a rider’s needs. Typically, the rider’s weight, riding ability and personal choice will determine the appropriate magnet size. Magped offers magnets in three sizes and our rough guide for choosing which magnet is reight for you is as follows: • 100N for bikers less than 100 lbs • 150N for bikers 110 – 185 lbs • 200N for bikers over 185 lbs or those looking for maximum grip. You can also add a set of our best-selling Strong Plates for up to 30% more grip.
Yes, one of the key benefits of mapged is the ease of customization. All our magnets and shoe plates are interchangeable so you can easily swap out your magents for more or less strength. All magnets, plates and other parts/accessories are available in our webshop.
We recommend 4 long pins in the front and 4 to 6 short pins in the middle and rear area around the magnet. Try to match the pin position to your sole size and sole profile. See photo below.
While using magped’s
The force of the neodymium magnets is north/south (up/down), ensuring optimal pull on the upstroke. When you start to move east/west (sideways) the force of the magped magnets decreases resulting in an easy release of your foot from the pedal. You will get used to being able to quickly release your foot with a simple movement of your foot to the side. You will hardly feel any resistance at all when disconnecting. Knowing that you are not “locked in” will give you confidence and peace of mind when riding!
Ensuring enough movement to the side, or edging your foot up off the pedal will ensure a smooth disconnection – unlike clipless pedals, no single (and often unnatural) movement is required.
Our pedals are designed with float in mind. Rotational float and change of position are nearly unlimited because, unlike clipless pedals, your foot can rotate freely on the pedal body without affecting the magnetic force.
magped offers the best of both worlds: the secure connection and efficiency of clipless pedals with the added freedom and safety of a flat pedal.
Unlike traditional clipless pedals, magped allows you to easily disengage when needed, providing peace of mind on any ride.
Absolutely yes! One of our favourite parts of the business is working with adaptive riders and those experiencing mobility issues to use magped to get back out riding. We are proud to have set up several hundred clients with a range of mobility challenges including above and below-the-knee amputations, drop foot, neuropathy, surgery rehabilitation and ankle paralysis. Our ENDURO2 pedal, featuring double-sided magnets, is the perfect choice for easy reconnection.
Since our pedals do not have a complicated mechanical system (like clipless) the function of the pedal will not be affected negatively by mud, ice or snow.
Like any clipless pedal, you should always clean off any excess mud or dirt to ensure an optimal ride.
No. As you get used to our system, you will find your positioning quickly and your foot will adjust to the proper position.
It may vary by a few mm each time. If you have not positioned the foot precisely enough, the position can easily be adjusted by turning/sliding your foot on the pedal a little.
You can also consider a set of our Positioning Plates if you’d like to reconnect to the same spot each time.
Order
We are primarily an online business and do not offer demo pedals due to shipping challenges, but if you are near our headquarters in Innsbruk, Austria or Squamish, BC than you can email us directly to test our pedals. Overall the return rate of our pedals is far less than 1% worldwide and we do offer a 30-day money back guarantee for lightly used pedals (with return shipping at the buyer’s expense).
 30 Day Money Back Guarantee: We stand by our product, and are happy to give you peace of mind with our 30 day money back guarantee for lightly used pedals. This policy is valid for return of pedals within 30 days of them being delivered to you. Please note, return shipping to our US or Canadian warehouse is at the buyers’ expense and we do not provide return shipping labels. We are proud to have less than a 1% return rate worldwide.
Shoes
SPORT2, ENDURO2 and ULTRA2: two-hole SPD shoe with as flat a sole as possible.
ROAD: 3-holed road bike shoe. GRAVEL: XC / gravel shoes with a 2-hole SPD mount.
You can find more information on shoe selection here:
shoe recommendationTechnical Questions
No. Our neodymium magnets’ charge will last a lifetime. All magped magnets are coated with a strong metal protective coating and the magnets are embedded in a strong stainless-steel holding pot. The pot protects the magnet against damage while also concentrating the magnetic force in the North/South direction where it’s needed.
You can see which version you have by the outer diameter of the magnet:
100N…20mm
150N…25mm
200N…28mm
The most likely cause of the clicking noise comes from the magnet holding sleeve nut. This can be fixed via the following procedure:
Press your thumb very firmly onto the magnet, so that the sleeve nut on the underside comes out 1mm. Put some bearing grease into the 1mm gap with a needle or an open paper clip.
If the noise is still happening: Remove the magnet and file the hole (where the screw that holds the magnet goes) with a round file. Then put a little bearing grease on the hole and build the magnet back on.
Finally, put a drop of glue (UHU, PATEX, Gorilla Glue) on the top and bottom of the damper. This prevents the magnet on the pedal from rotating and thus loosening the screw over time.
Another potential cause could come from the shoe plate:
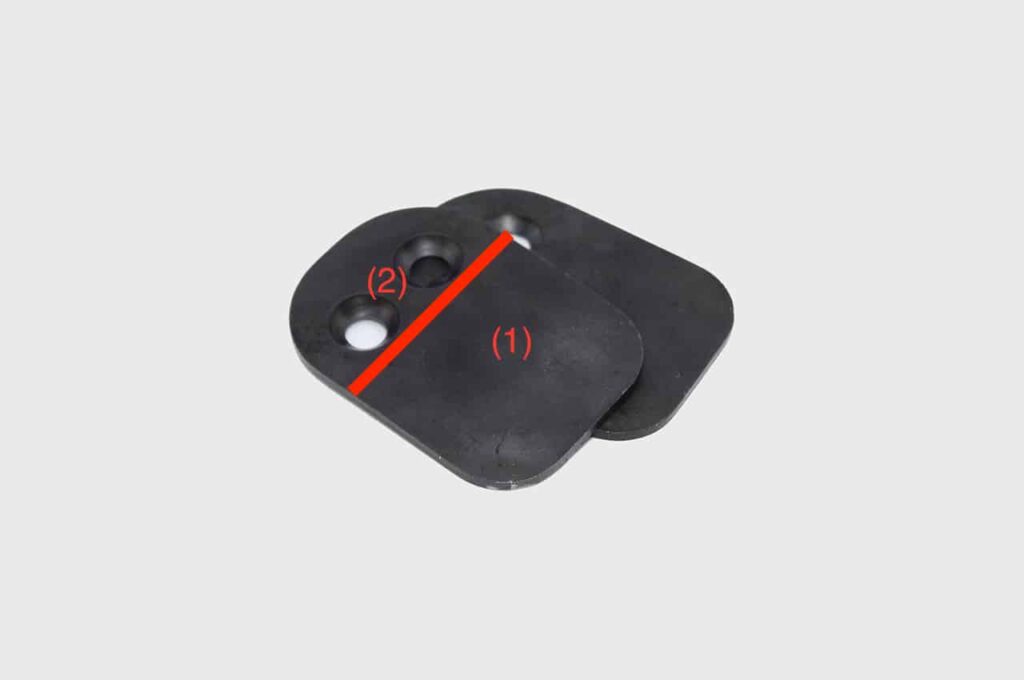
The shoe plates have an edge where the red line in the picture is. When the round magnet attaches on the edge the magnet will seesaw between the surface (1) and (2) making a clicking noise > you need to reposition the metallic shoe plate on your shoe (push forward or backward). That way, the round magnet attaches 100% on the surface (1) of the shoe plate.
If the clicking still exists, please send us a message.
It is most likely coming from the screw that holds the magnet in place.
Please proceed as follows:
With the magped ROAD and ROAD2, however, the cause could be very small stones or dust under the plastic shoe plate. --> Please remove the plastic shoe plate and remove any dirt underneath. Then apply a drop of chain oil to the metal plate and spread it over the entire surface of the plate with a cloth. Please make sure that no oil gets into the 4 threaded holes, as this will cause the screws to loosen very easily.
With the magped GRAVEL, the cause could be very small stones or dust under the gray spacer blocks on the pedal. --> Remove the spacer blocks, clean the blocks and recesses, and screw them back on.
For all magped pedals, the cause could be some dirt in the bearing.
Please disassemble and clean the pedal using the video below:

 Español